Restoration methods
Old radio restoration approaches
Author: Arjen van SchaikRestoration. How do we proceed?
Assessment:
When we start restoring we will have to look at the device for defects and write this down. Then assess whether the parts we need are available because to restore an incomplete radio is a waste of time. Make sure all parts are present.
Example list:
- 2x scale light 6.3V 0.2A,
- a few meters of cord for the scale indicator,
- a few meters of steel cable 0.3mm,
- 1x scale indicator spring,
- 1x AZ80 tube,
- volume potentiometer cracks,
- band selector works poorly.
Room:
Disassembling a device takes up more space than you think, so make enough space. Find a closed box for the smaller parts.Tools:
Good tools are important in order not to damage the parts. Make sure the box is filled with the right tools.Disassemble:
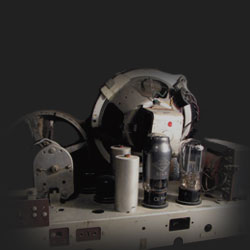
We can now disassemble. Lay down a towel or other soft cloth to avoid damaging the cabinet. Remove the back plate, if it is stuck to the bottom plate, turn the device and release them together. We are now looking straight into the device where we can already draw the first conclusions. Loosen the buttons on the front/side. Due to regular cleaning, the screws will rust and will not come loose. Make sure you have a well-fitting screwdriver, if this doesn't work, put a drop of oil in it. Check if there are any chassis wires attached to the box and note where they were. Warm up the soldering iron and disconnect the "cat's eye" (if present) and remove it. Now that the soldering iron is up to temperature, we solder the wires from the speaker. Unscrew any lights that are mounted to the cabinet if possible. Check whether everything is loose from the chassis and unscrew it.Rust:
Rust on the chassis will have to be removed. Use a copper brush on a small spinning top (eg from Dremel) this prevents unnecessary scratches. Never use sandpaper yourself, do not use 1500, this will continue to be seen and unnecessary parts will be touched.The spot that arises will clearly have a dark color, this is because the cadmium layer has disappeared. If you don't do something about it, this place will rust again. An inexpensive means is to treat it with nickel with an electroplating set, which is freely available. You will still see the place, but it will not rust.
There are of course also better solutions, but these are simply too expensive to make restoration affordable. Once you have started this phase you will soon want to continue with super cleaning, try to control yourself.
Chassis underside:
The underside is where the components are and needs to be cleaned well, but do not use brasso or another metal cleaner, do not attack resistors or capacitors, because this will only get worse. The parts are usually too porous to undergo another treatment.Switches:
The switches are sometimes grease and that is against oxidation first remove the excess and clean the contacts with as little contact spray as possible. Use a spray that does not leave behind any grease. You can also spray the brush in order not to get any spray in the entire device. Kitchen paper is a good absorbent paper to remove the moisture. When using cloths, wires remain on the contacts, which in turn causes malfunctions. It is not easy to clean the switches, but patience is a virtue. Where grease has been used, grease will have to be applied again, do this with Vaseline, this is acid-free and does not cause any damage.Entrances:
The antenna, pick-up input and the speaker output may also be cleaned with Brasso, making sure no residue is left behind (cotton swabs are permissible).Potentiometers:
Creaking potentiometers are always a problem and replacing them is usually not an option. So a good spray is the easiest solution. It is best to disassemble the potentiometer first to ensure that the dirt and moisture can run out. After cleaning, you can test it with the help of an amplifier or with the scope.Components:
Parts that have fallen apart have to be replaced try to look up the value in the documentation or if possible read off and measure if necessary.You can also measure them but then the value will not match the original value so you will have to make a choice to the most probable value.
Burnt parts are of some concern as they indicate a problem that is unlikely to be caused by the burnt part. This will have to be rectified later when the appliance is ready for operation again.
Wires:
Only with old devices can the wires be digested and replacement is the only solution. Most threads are still for sale the color can sometimes be a problem.With old devices, wire with cover is often used, these are still available, but the color is sometimes the problem. While unsoldering the wiring, which is sometimes a fiddle, it is wise to protect melt-sensitive components such as the well-known capacitor. Before you know it, it has melted. We will take a closer look at this capacitor later. After soldering, there are always black residues that we can remove with a special spray.
Other parts:
The tuning capacitor may be damaged, although this is not an immediate problem, at most that the frequencies are not correct. The problem does arise when the plates touch each other. Make sure that the plates run parallel to each other. The tuning capacitor bearings should run smoothly, a lick of petroleum jelly works wonders. If the Vaseline does not go in well, make it warm so that it becomes liquid. Running wheels should run smoothly a drop of sewing machine oil won't hurt if the wheel can be disassembled, Vaseline is preferred.Transformer:
The transformer is usually dusty, just blow it clean and paint thinly where necessary. If the transformer has a protection, clean this contact well.Tuning pointer:
There is almost no radio where the tuning mechanism still works well. It can sometimes give some annoyance to get this job done. We proceed as follows. Check whether the length of the steel cable and cord can still be found, often the length is simply stated in the documentation. If we have to determine the length ourselves, it becomes a bit more difficult. We determine the length ourselves by starting with the tuning capacitor. The first piece is the piece from tuning capacitor to the start or end scale where the spring is mounted. When the tuning capacitor is completely turned back, there are about 2-3 turns on it, which gives a ½ to 1 turn at the return. Thus, the number of revolutions of the tuning capacitor is important. When we have approximately determined this length, we make a loop on one side. You do this by folding the wire and pressing a bush over it and then clamp it. We do the same on the other side, but we do not clamp it yet so that we can still move it. There is usually a cord on the other side because it slips less than a steel wire. We look for the way of the wire and do the same as with the steel wire, only with the difference that there are 3 to 5 windings on the drive shaft, the shaft determines the number of windings together with the wire thickness there must be enough windings on it so that it does not slip and do not walk more than these on top of each other.When the wires are ready to be cut to length, the wrapping can begin. Turn the tuning capacitor so that it has the missing number of turns. Make sure that there is a hook on the end point with which the wire and spring can be secured. Squeeze the bushings and see if it works. The spring must be stretched far enough because over time the cables are stretched slightly.
Testing the device:
Check the power cord and plug for breakage. We will first test the device for defects without installing it. You can then reach everywhere.!! Be careful because this is a dangerous job !!
Place the device in a safe place away from screwdrivers and other metal objects that could cause a short circuit. Place all tubes in it and turn it on. If you are in possession of a separate loudspeaker, connect it to see if it meets the ohmic value. Devices with an output transformer usually have a speaker of 8-4 ohms, without a transformer this is often 300 ohms.
The wooden cabinet restoration

Preface:
Solid wood cabinets are usually not lacquered plywood cabinets. The paint is made up of a ground colorant, a kind of stain, and a gloss lacquer, which may or may not be colored. I have outlined the most common situation from many studies below and therefore does not always apply. Restoration is done at your own risk.Most common problems:
The paint is cracked and is in danger of peeling off. The case is scratched so we see light stripes. The wood veneer is broken and pieces are missing. The cloth is dirty or damaged. These are the most common problems. I've tackled and implemented all of these issues. In this section, we'll cover the entire cabinet refinishing process.
The paint is cracked and threatens to come off:
If the paint is at that stage, it is in bad shape. Press with a blunt and smooth object over the paint if it comes loose or cracks even more, everything has to come off. Do not immediately grab sandpaper because then it will go wrong. We take a cloth and wet it with thinner. Rub over the paint and see what the reaction of the paint is. Usually nothing happens, if it is the case that the paint does become soft, then the old paint is almost gone or has already been repainted. If nothing happens, we will still sand and do this with waterproof sandpaper, grit 320 or something lower. The intention is that we only sand off the top paint, which is thinner resistant. So we don't sand down to the wood because the layer of wood on it is very thin and before you know it you go through it. During sanding, a white-like substance is usually released, this is the paint. As soon as the fabric discolours we are on level. Be careful because usually a few times over it is enough and then you see little dust. Almost done with sanding. When we have sanded the entire radio we take the thinner and a brush again. We lubricate the cabinet with thinner (try a piece first). When we have sanded through the paint, the surface will dissolve, this is the colorant of the cabinet. If not, we'll have to sand some more. When the paint softens, we treat the entire cabinet with thinner and weigh it clean with a cloth or even better a loose box cutter and scrape it off. You will see that the cabinet retains its original color as the coloring agent pulls back into the wood through the thinner. Don't wipe everything off, we need a little bit to even out the cabinet with that same brush. We are lucky that thinner evaporates very quickly and the cabinet does not get too wet. We have to let the cabinet dry for a while before the next treatment. We have now treated the cabinet without damaging it and sanded it with 500 grit just to remove the grains and other irregularities. Have you gone too far mean a cloth with a little thinner and rub it evenly.The colour:
A smooth surface is half the battle. The color of the paint has to be sorted out and radios are often dark in color. Use a colored lacquer based on turpentine as a substrate if the radio needs to be darkened. The darker the cabinet, the less damage you see.We do not apply the color lacquer with a brush or with a roller, sorry Freek. We take a non-hairable cloth. Grandpa's white underpants usually work well. Dip a point of the cloth in the colored lacquer and do not be too stingy. Rub this into the cabinet and rub it out well so that you don't see any streaks, don't wait too long because thin layers dry quickly.
Every time we have applied a layer we let it dry well and repeat this until the color is good (max 3x). It is therefore important not to choose the paint that is too light in color. Sanding is not necessary in this process, the layer is too thin. Before applying the lacquer, we have to sand off the dust with grit 500 or higher. If the case feels smooth, it's good.

Topcoats:
The varnish I used is yacht varnish, which can also be mixed well with the colored varnish. If we want the cabinet to be a little darker, we mix some colored lacquer on both turpentine bases, so no problem. The ratio for lacquering is 20% max. color lacquer and 25% max. turpentine. The application of the lacquer will have to be done with a paint sprayer for the best result, hence the dilution. Don't panic, because there are model paint sprayers for sale from 17 euros. And don't panic about the compressor either, because you can also buy an aerosol that supplies air.The real pros among us know better but it works. Spraying the cabinet is not that difficult. Make sure that the environment is free of dust, then clean the cabinet with ammonia and rub the cabinet with your clean hand. Provide a well-ventilated room. Lots of light, good visibility and space are needed for the best results. Spray the cabinet down for a small haze first. Do not put the sprayer too close to it, but reduce the amount until there is a little shine on it, not too much because then it will drip.
Ready? No!
Allow the cabinet to dry for at least a few days, sand it lightly and spray it again for a better coat of paint. When the cabinet is ready, we still see dust, so it is necessary that the cabinet is well cured. The shine we have achieved is too high for such an old radio and you will see too much on it, so that is why it will receive a final treatment (this is not really necessary).We take a water proof sandpaper with a grain of 1200-1500 and sand the cabinet smooth with a little water. Do not spill on the untreated wood. The more the paint has hardened, the better this goes. Caution Even with 1500 sandpaper, the sanding is still very fast.
Make sure everything is hit, the big shine is now gone. Now take a soft cloth and car cleaner and start polishing. It should not be too hot because then the cleaner will dry too quickly. Make sure everything is done right and polish it with wax, yes, it will shine again. For a perfect finish after rubbing with teak oil. Cleaning and waxing have the nasty white side effect. The radio looks like new again.
Afterword: Of course it is not easy and it is an intensive, long-term job, it also takes a few days. You need a lot of patience and some skill. But if you don't try you don't know.
Add comment:
| Name: | ||
| code protection:* | ||
| email:* | ||
 Main
Main- About
- Antique radios
- Old Radio Collecting
-
Radio repair links
- Old Radios Troubleshooting Quick Guide
- Tube radios repair technology
- If you receive the parcel with an old radio