Reception Radio Corporation 5-Tube TRF Receiver Restoration
Reception Radio Corp. Philadelphia
Author: Edgardo Castro Bruse| Author: EDGARDO CASTRO BRUSE |  |
San Salvador June 8, 2021
Introduction
Some time in November of 2019 I bought this radio from a respected Ebay seller ip500. I was motivated to buy it because of its beautiful blue coils, and the fact that it had three individually tuned circuits.


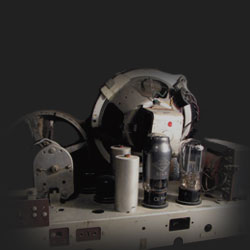
Description
This is a TRF receiver with three tuned circuits: The antenna amplifier, the RF amplifier and the detector. Each circuit is tuned with a variable condenser operated by an impressive large knob.The radio has two stages of audio amplification. It has a headphone jack connected across the primary of the audio driver transformer, and a speaker jack connected between the plate of the output tube and the B+.
I drew its diagram directly from the chassis. This hand made diagram was professionally re-drawn by my friend Raúl Urquilla YS1UF. This diagram includes an RC modification in the driver's stage. Please see diagrams:


Repair Work
After visual inspection some cold solders were discovered.


Then, the 6 ohms rheostat, that controls all the tubes except the detector was tested, and became evident that it had to be thoroughly cleaned. This rheostat is different from others, because it is a FLAT RHEOSTAT. I took it apart, cleaned it up carefully and put it together again. This was an elaborated process.


The Ebay seller noted that the Audio Driver Transformer had its primary open. I tested it, and indeed it was open. Since the secondary was good (7000 ohms) I used it as primary, and coupled the driver tube to the output tube using an RCL circuit.
Please see pictures before and after modification:


Now the radio was ready to be tested.
I used the loop antenna I described in my last article, and improvised a power supply.
The radio worked at first trial with excellent results.
After 4 or 5 days of using the radio I began noticing an increase and decrease in volume. After re-cleaning the contacts of the tube sockets and re-soldering some joints with no improvements; I blamed this condition on the Rheostat I had already cleaned! So I decided to replace it!

I had a new 15 ohms / 20 watts wire rheostat.

To reduced its resistance to 6 ohms I connected a 10 ohms/5 watts resistance in parallel with it.


This arrangement works well, except that the combined resistance varies non linearly, which means that, specially in the last 1/4 part of the trip, the combined resistance decreases very rapidly.
This change improved somewhat the changes in volume, but not cured them completely!
In an effort to completely solve the problem of changes in volume. I decided to replace the grid leak resistance and its 250 pf condenser.
I connected two 500 pf condensers in series to get a 250 pf equivalent condenser. I used a 2 mega ohms resistance as grid leak. This new action improved the situation, but still I had some small up and down volume changes, thou they were farther apart.


All tubes tested good, and I had indications that the problem was in the detector's stage.
I constructed an adapter using an 1S4 tube to replace the 01-A. The results were very good and the radio´s sensitivity was noticeably increased. The end result was near perfect and I can live with IT!


The Power Supply
I checked my junk box and selected what I had to build this power supply.I used a bridge rectifier for the B+ voltage, and did some experimentation with the DC filament part. First I used regular silicon diodes. Then I replaced them with a CTB34 Schotty Full Wave Diode rated at 40 volts 15 amperes that I had. EUREKA! The output voltage, under a load of about 1 amp., went from 4.15 to 4.75 volts! This makes a big difference in the performance of the radio.


Final Remarks
Operation of this radio, using a Tuned Loop Antenna, es somewhat similar to opening a Safe Combination Lock. For every station the three Radio Dials and the Antenna Dial must be at the same exact frequency. This makes tuning a bit troublesome, but at the same time selectivity is improved. When a station is too loud detuning any of the circuits may act as a volume control.


To finish, I will say that restoring this radio has been a learning challenge that has enriched my radio experience. Also I want to thank my friend Raúl Urquilla YS1UF for his help with the diagrams.
| Tuning Chart for Radio Reception Radio Corp. | |||||
|---|---|---|---|---|---|
| Red: Red scale in Ant. Chart. Blk: Black scale in Ant. Chart | |||||
| Ant. | R Dial2 | R Dial1 | R Dial | Station | Frequency |
| 600KHz.Red | 64 | 67 | 65 | VOX YSLN | 600KHz |
| 720KHz.Blk | 52 | 44 | 44 | Qué Buena YSRA | 720KHz |
| 770KHz.Blk | 38 | 38 | 38 | Poderosa YSKL | 770KHz |
| 800KHz.Blk | 41 | 34 | 34 | Radio Pax YSAX | 800KHz |
| 840KHz.Blk | 37 | 30 | 30 | R.St. Biblia YSF | 840KHz |
| 900KHz.Blk | 30 | 25 | 25 | R. Tiempo YSQJ | 900KHz |
| 930KHz.Blk | 25 | 23 | 23 | R. San José YSTG | 930KHz |
| Note: If you use a long wire antenna and a good ground, strong signals will flow into the tuning circuits, and this will simplify the tuning process. | |||||
Add comment:
| Name: | ||
| code protection:* | ||
| email:* | ||
 Main
Main- About
- Antique radios
- Old Radio Collecting
-
Radio repair links
- Old Radios Troubleshooting Quick Guide
- Tube radios repair technology
- If you receive the parcel with an old radio