Articles
Repairing valve radio sets
Author: Alan Lord Very early sets made in the twenties and early thirties were mostly T.R.F. (Tuned Radio Frequency) design then the superhet (SUPERsonic HETerodyne) circuit was developed and, due to it’s superior performance took over as the basic design of virtually all sets from the thirties to the present day.
T.R.F. Sets The earliest radio sets (1920s to mid 1930s) were known as T.R.F (Tuned Radio Frequency )sets because the incoming signal was demodulated from it’s original frequency. The simplest set was the crystal set which consisted of a tuned circuit, a demodulator and headphones (the demodulator was usually a crystal of galena in contact with a small piece of wire known as the cat’s whisker, this had to be adjusted over the face of the crystal to find the sensitive spot). As no amplification was used the crystal set could only receive local stations, with a good aerial and earth stations up to 20 miles away could be heard.
Superhet sets
The principal of the superhet is to convert the incoming signal frequencies to a common frequency, referred to as the I.F. (Intermediate Frequency) typically about 465Khz. All that is required now is to design a stable high-gain amplifier for this frequency only followed by the demodulator and audio amplifier stages.Although there are hundreds of makes and models they are nearly all based on two types of circuit,either a three valve plus rectifier (osc/mixer, I.F. amp, det./output) or four valve plus rectifier (osc/mixer, I.F. amp, det/A.F. amp, output). There are a few sets that use a tuned R.F. amp before the mixer (to improve image rejection) this is a great improvement on the short-wave bands where the image is close to the wanted frequency.
 I have based my fault finding information on a generic 4v + R circuit. Print out the circuit and use it as a reference. Voltage readings were taken using a 20,000 ohms per volt meter, if you use a digital meter some voltages may measure higher (due to the high impedance meter not loading the circuit under test).
Before Connecting to the Mains
Before applying mains voltage to a "new" set I usually give it a quick check, this is done by removing the rectifier and connecting my switch-mode HT supply to the cathode pin in the valve-holder (any supply capable of producing up to 250V DC will do as long as you can control the max current it can provide I will place a suitable circuit on the constructors pages when I get time) The supply is set to current limit at about 20 milliamps. When the supply is turned on usually the voltage takes a long time to rise, this is due to the electrolytics in the set re-forming. If all is well, the voltage eventually reaches the pre-set limit and the current falls away to a few milli-amps. The final current depends on the design of the set, some use voltage dividers to supply the screen grid volts for the mixer and if amp - a voltage divider consists of two resistors connected in series across the HT supply, the voltage at the junction supplying the screens. These resistors usually draw about 3 milli-amps from the HT line. I would expect the final current to be slightly higher due to slight leakage in the electrolytics. If the current is much higher --- say 10 to 15 mA then look for leaky decoupling capacitors --- especially if the set is full of wax covered ones!, also try disconnecting the smoothing electrolytics as they may not have formed up very well and could be leaky - replacement is the only cure.In universal sets, there is one component that will need checking, it is the capacitor that is connected across the incoming mains, this is the rf bypass capacitor. It is fitted to prevent rf signals picked up on the mains from reaching the aerial circuits of the set via the rectifier - see "modulation hum" at the end of this servicing article --- if it is the wax covered type, replace it, if you leave it in - it will go bang when you least expect it! Fit a ceramic type. 01uF 1000V working.
Next check the condition of the mains lead, if it's the old rubber insulated type --- don't bother checking - it will be perished, just replace it. If you want the set to look original, use the type of flex that you get on electric irons, it looks similar to the original type. If it is a universal set make sure that the neutral is connected to the chassis and make sure that the on/off switch is wired in the live side, re-wire it if this is not so --- for some reason some set makers wired the single pole on/off switch in the neutral (chassis) side. This means that when the set is switched off, the chassis becomes live! If you are not too fussy about keeping the set original, you could replace the switch with a double-pole one (the switch is usually combined with the volume control so you will have to replace the complete unit).
Also check the condition of the wiring to the speaker and dial lamps, if it's also rubber covered it is likely to need re-wiring (if the wires feel hard, you will probably find that the insulation crumbles away when flexed). If the wiring is suspect then check all the wiring under the chassis as well - it may need extensive re-wiring --- this is likely to be the case with pre-war sets.
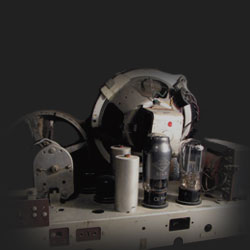
When you have done all this, it should be safe to connect the set to the mains supply and test it ----- unless you have an Ekco like mine - it had a 240V dial lamp that promptly exploded when the set was switched on ------- frightened the life out of me! See Ekco U.243/1 in gallery --- that was the one thing that the testing missed. With luck your set may work but it is certain to need further attention, the next section deals with the most common faults found stage by stage.
The power supply
Before working on AC/DC (universal) sets make sure that the chassis is not live, better still use a 200w isolation transformer to supply the set while you are servicing it!On AC/DC sets the H.T will come from a half-wave rectifier followed by a reservoir capacitor, a resistor and a smoothing capacitor. Sometimes a choke is fitted instead of the resistor, this gives a higher H.T. and more efficient smoothing. The H.T. will be about 120v to 180v typically. On AC only sets there will be a full wave rectifier supplied from a center-tapped secondary winding on the mains transformer the H.T. can be from about 250v - 350v in older sets to about 150v-200v in sets using "miniature" valves. The usual faults are low H.T. and a loud hum from the speaker caused by failing res/smoothing caps, or just low H.T. due to a low emission rectifier valve.
The output stage
The output valve is usually a pentode or a beam tetrode, the anode and screen grid should have full H.T. on them (no H.T. on the anode usually means the output transformer primary winding is open) the control grid should be 0v and the cathode should have about 4.5v - 12v depending on the type of valve used.The most likely fault is distorted sound and a positive voltage on the control grid. This will, in most cases, be caused by a leaky coupling capacitor from the anode of the A.F. amp or a feedback coupling capacitor from the anode of the output valve, via a tone control circuit, to it’s grid circuit.
Another possibility is internal leakage within the valve ( UL41 / EL41 valves are very prone to this ) what happens is that emission from the heater coats the inside of the glass around the base, the coating is conductive and this causes the leakage between the pins ( the coating can be removed by use of a high voltage see constructors pages for the circuit of a unit that can be used to get rid of the leakage). It is also worth checking the cathode bias resistor as it may have gone low due to the above faults - if left it will damage the output valve.
If the output is weak and the cathode voltage is low ( anode & screen OK ) then the valve is low emission and will have to be replaced. If the voltages are all OK and output is still low then the cathode bypass capacitor is probably open circuit.
The demodulator and A.F. amp
The A.F. amp is normally a triode, usually also incorporating the demodulator diodes.Faults here usually cause poor quality sound. Check the anode load resistor as it tends to go high also the coupling capacitor to the output stage for leakage. Another cause of distortion is leakage between the volume control’s track and it’s casing. This can be checked by disconnecting all three terminals and measure between them and chassis with a sensitive ohmmeter. If you get any reading then you will have to take the control apart and clean away the layer of dirt that has built up between the track and the casing (this causes distortion as the leakage resistance alters the load on the demodulator diode ). If the sound is OK but cannot be turned right down then the cathode bypass capacitor is probably O/C.The other diode is used for A.G.C. (automatic gain control) it’s anode is coupled to the anode of the I.F. amplifier by a low value capacitor. As the signal strength rises a negative voltage develops on the anode of the diode. This voltage is supplied through high value resistors to the grids of the I.F. amp and the mixer. There are decoupling capacitors at the agc line where it connects to the grid circuits of the I.F./mixer stages, these tend to go leaky and this will result in ineffective agc action which causes distortion on strong signals due to overloading of the I.F. amp.
The I.F. amp
The I.F. amp is usually a variable gain pentode as this gives better A.G.C. control. The most common fault in the I.F. amp is instability, usually caused by O.C. decoupling capacitors in the H.T. supply to the stage but can also be caused by poor earthing of the valve’s metalised coating, this is likely if the valve is loose in it’s base. You will find the earthing wire around the valve where the valve meets the base. If the wire has come away from the metalising then wrap a length of braid around the metalising and make sure that the earth wire is bound in finish off by wrapping insulating tape around it.If the I.F. gain seems to be low (only local stations received, no background noise between stations) check the anode & screen grid voltages, with the aerial removed or the set tuned off station to prevent a.g.c operation upsetting readings, the anode should be at full H.T. potential the screen is supplied through a resistor and usually reads about 100v. If the reading is very low then check that the resistor has not gone high also check the decoupling capacitor for leakage.If the anode & screen voltages are OK and there’s little cathode volts (less than 1v) then the valve is probably low emission. NOTE in some sets the cathodes of the I.F. amp and mixer valves are taken direct to chassis, in this case use the screen grid voltage to check valve emission ( screen voltage will be high with a low emission valve).
If all seems OK and the gain is still low then there could be problems with the I.F. transformer’s tuning capacitors this can be checked by tuning the set to a weak signal and CAREFULLY adjusting the I.F. transformer cores two or three turns either way from their original positions, do this one at a time and return the core to it’s original position before moving another one. All cores should "peak" at or near their original positions if one core makes no difference to the signal then it’s tuning capacitor could be o/c or the winding is being "damped" by excessive loading ( grid /cathode leak in I.F. amp valve or "soft" valve or leakage in the agc rectifier diode’s coupling capacitor).
The frequency changer
The frequency changer consists of the local oscillator and mixer stages, faults here can cause noisy reception, operation on some bands only or no reception at all.For no reception on any band check the local oscillator triode voltages, the anode is supplied through a resistor which can go high (should be about 90v on anode) there should be a negative voltage on the grid if the valve is oscillating if not check the anode & grid coupling capacitors by substitution ( one could be o/c).
If reception is weak and noisy check the aerial coupling circuit especially in "universal" sets, you may find that the coupling windings on the tuned circuit coils are burnt out. This can be caused by failure of the aerial isolation capacitor in "universal" sets then if the chassis is live full mains voltage will appear at the aerial socket and if this is connected to anything that is earthed then there will be a loud bang and the coupling windings will blow!. Similar damage can occur to any set during a thunderstorm when surges coming down the aerial damage the aerial circuit in a similar fashion.
It is quite easy to rewind the coupling windings, just remove the affected coils from the set and un-wind the damaged winding, counting the turns as you go. Rewind with new wire and refit the coils all should now be OK. The valve itself can cause noisy reception usually lightly tapping the valve will prove this but before condemning the valve make sure that the valveholder contacts are clean!
If gain is low check the screen grid voltage ( expect about 100v) if low check the screen supply resistor and screen decoupling capacitor.
Reception on some bands only can be caused by dirty contacts in the bandswitch, clean with WD40 or similar. Another fault caused by the switch is audio distortion caused by leakage in the insulation allowing positive voltage from the H.T. to reach the audio stages via the gram position contacts. Apart from replacing the switch the only way to clear this is to remove the H.T. from the switch and hard wire the supply to the R.F. stages, this means that when you switch to gram the R.F. stages will still be powered but it will not affect operation of the set although there might be slight break-through of radio signals when switched to gram. If your set has an R.F. amp before the mixer you will find that it usually uses the same type of valve as the I.F. amp so fault-finding will be the same as for the I.F. stage.
There is another fault that can rear it’s ugly head, the symptoms are as follows. When the set is tuned to a station there is a hum in the background, sometimes causing distortion. When the set is tuned off station, the hum disappears----this is known as MODULATION HUM..
Usually the H.T.supply is found to be blameless as faulty decoupling here would cause hum in the audio stages as well. A simple test to see if the local oscillator is OK can be done by using another radio. Tune the other set to a quiet part of the medium wave band near the high-frequency end. Tune the suspect set from the high frequency end of M.W down the band, at some point you will pick up the local oscillator on the other set. It should be quiet with no trace of hum. if there is hum then the mixer valve could have a heater/cathode leak. If the oscillator signal seems OK then check the mixer‘s grid leak resistor (could be o/c), also check the demodulator / audio amp valve by substitution ---- especially if it’s a UBC41 or EBC41 as these valves suffer from the build up of a conductive coating around the base causing leakage between the heater and the demod. diodes and usually the triode grid as well.
Modulation hum can also occur on strong local signals, weaker signals not being affected. This is not usually due to a fault but can be caused by the mains flex acting as an aerial, the rf signal then finds it’s way into the aerial circuits, often via the rectifier valve with the result that the strength of the signal depends on whether the rectifier is conducting or not. This effectively modulates the signal at mains frequency resulting in hum on local signals. In a "universal" set the cure is to fit a . 01 m f disk ceramic, rated at 1,000v, between the anode of the rectifier and chassis or between the anode and cathode of the rectifier.
For AC only sets connect a capacitor across both halves of the rectifier (anodes to cathode), also connect a. 1m f 1000v between cathode and chassis. I always specify 1,000v capacitors for those positions to guarantee reliability as capacitor failure can destroy the rectifier and/or the mains transformer if an inferior component is used.
If after going through all this your set STILL doesn’t work then you really have got problems all I can say is I’m glad it’s not mine!
Add comment:
| Name: | ||
| code protection:* | ||
| email:* | ||
 Main
Main- About
- Antique radios
- Old Radio Collecting
-
Radio repair links
- Old Radios Troubleshooting Quick Guide
- Tube radios repair technology
- If you receive the parcel with an old radio