Recovery technology
Soldering rules for antique radios
Author: John LoveringSoldering Is Simple...If You Do It Correctly!
Note:Below I refer to the soldering to be done on such circuits as might be found in antique radios, using a soldering gun of at least 100 watts. Soldering pencils and soldering irons are for printed circuit board soldering.
Basic Tools:
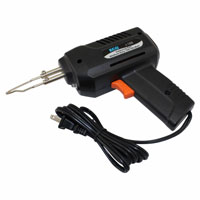
- Soldering Gun - with a minimum 100 watts power. Little soldering irons or soldering pencils are for printed circuit board soldering...they do not get hot enough for antique radio work.
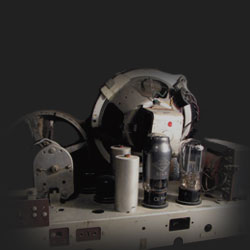
- Soldering Aids - split-end and bent-end tools used to twist, pry, and poke during the soldering process. Device on far left of "Soldering Aid Tools" photo is a "heat sink" used to conduct heat away from heat-sensitive components (small capacitors, resistors, etc.) Blue device on far right is a Solder Vacuum ...read below. All are available from Radio Shack and other electronic parts suppliers.
- Solder - 60% tin 40% lead rosin core. Do not use acid core solder - it can corrode!
- Desoldering Braid (Fig. 3) - Used to clean solder from a connection to be taken apart.
 |
 |
 |
| Soldering Gun | Soldering Aid Tools | Desoldering Braid |
No soldering should be done on any circuit to which the power is applied.
Procedure:
A. The first thing to do is to prepare the soldering gun tip by "tinning" it. (You can purchase some tips that are pre-tinned) Turn on the gun and while it is warming up (it won't take but a few seconds) rub the faces of the tip on a piece of emery cloth so that the copper surface becomes clean and bright. As the gun tip approaches operating temperature, the color of the copper will change. After this takes place, again clean the tip quickly and apply the end of a piece of solder to it. The solder should melt instantly and form a clean bright layer over the copper. Apply only enough solder to form this coating. If a lump forms, wipe it off with a thick rag or a wet sponge.
B. Surfaces to be soldered must be clean, free from dirt and grease. Use of emery cloth or a glass fiber brush (available at Radio Shack) is recommended over steel wool. ( Never use steel wool any where near the chassis as pieces of it can get lodged in the circuit causing short circuits, problems with the speaker magnet, or grounding of the plates on the tuning capacitor). If you are removing the insulation from a wire, scrape the wire clean with a knife. Be sure all traces of the insulation are removed. If the wire is stranded, separate the strands so that as many of them as possible are cleaned.
C. When connecting a terminal or another wire, it is best to make a good mechanical connection first by hooking or twisting the two pieces together. Do not depend upon just the solder to hold these together ... it most always will fail ... eventually.
D. Take the soldering gun in one hand and the solder in the other and apply both to the wire connection. Melt down the solder with the tip of the soldering gun so that both the solder and and the rosin run on to the wire. Keep the soldering gun in place long enough to allow the molten mixture to penetrate the joint. Let the solder simmer a little and then remove the gun tip, being careful not to disturb the connection until the solder solidifies. NOTE: Do Not heat a joint longer than necessary to flow on the solder smoothly. Excessive or prolonged heat can sometimes damage components such as resistors or capacitors. If you do not apply enough heat, the joint will have too little solder flow. This joint will eventually develop a high resistance and give trouble.
E. As you use your soldering gun, the tinning will tend to burn off and the copper itself will become black and corroded. Eventually small pits will develop in the surface of the tip. Never neglect to clean off the corroded surface, using nothing more than a rag, or if necessary, a piece of emery cloth. A wet sponge is also very handy for wiping the tip immediately after the soldering job. It will remove the coating and leave the tip bright and shiny. If the tip is pitted you may have to use a file to smooth it down before re-tinning. Do not remove more of the metal than necessary while filing.
F. What Can Be Soldered? - Brass, copper, iron, steel, and zinc can be soldered with an ordinary soldering gun and ordinary fluxes. Aluminum cannot be soldered because it is always covered with a natural film oxide which cannot readily be removed. Don't waste any time trying to solder copper wires to an aluminum panel; it just won't work.
G. What Is The Purpose of Flux? Using plain solder would usually not be successful in joining a connection. The application of the hot tip causes the formation of an oxide of the metal on its surface and this film, although only microscopic in thickness, prevents molten solder from adhering to the material. The rosin absorbs this protective coating just as quickly as it forms and allows the solder to flow into the pores of the metal, thus making a good tight joint. The rosin is known as a "flux" and it does not cause after-corrosion.
H. You should only solder in a well-ventilated area. The fumes from lead solder are harmful and every attempt should be made to minimize or avoid inhaling them altogether. There are some new non-lead solder products on the market...you might want to try these though many require a higher heat to melt.
I. Beware: Don't splash solder inside the chassis or tube socket. Remove spills and splashes with a pair of tweezers. If you do not, they can cause short circuits.
J. Unsoldering Connections: When you wish to remove a part, heat the joint with the soldering gun tip. When the solder begins to melt, use unsoldering braid to soak up the melted solder. After the solder cools, cut off the soaked end of the unsoldering braid so that it will be ready for the next use. You must always have bare copper unsoldering braid in contact with the solder you are trying to remove. Once you have removed all the solder you can using this method, you can use the split-end soldering aid tool to work the wire(s) loose. Remove any bits of wire or solder that spill into the chassis. Another useful tool is the Solder Vacuum (blue device in photo above), which is simply a cylindrical "suction pump" device which can be used to "suck up" the molten solder. There are some relatively inexpensive models available at Radio Shack and other suppliers.
John Lovering
Add comment:
| Name: | ||
| code protection:* | ||
| email:* | ||
 Main
Main- About
- Antique radios
- Old Radio Collecting
-
Radio repair links
- Old Radios Troubleshooting Quick Guide
- Tube radios repair technology
- If you receive the parcel with an old radio